The z80sim by Udo Munk comes with the ability to set soft breakpoints. A soft breakpoint is where an instruction is temporarily replaced with a HALT instruction and the program runs until it gets to that point. Then the emulator announces “we got to …”, puts the original instruction back, and lets the user choose what to do next. However, sometimes that doesn’t work.
Take the situation where you are reading a program from a disk/image. You’re about to load, and execute the program. You’d like to load it first, have a look at what it has in mind, and then step through it to see where things go wrong.
You can’t set a soft breakpoint in a location in memory that you are about to load over. You need the soft breakpoint in the byte that gets loaded into memory; not in the byte that was overwritten by it.
There are ways around that issue. The obvious one is to set a soft breakpoint in the instruction just before you jump into the loaded program. That works in most cases. Where it doesn’t is a ROM. You can’t write a soft breakpoint into a read-only memory. It is also difficult, but not impossible, if the last instruction before going to the loaded program is something like a “JP Z, program address”. That one instruction gets run lots of times, until all of the sector / track / program has been loaded. Only then, does it jump to the loaded program. With many debuggers / monitors you need to set and reset the breakpoint over and over again, until you’re up to the final one. Udo seems to have recognised this issue as he has included the ability to set a count against each of the soft breakpoints. It only “breaks” program execution once the specified count has been exhausted. You can run the loop 512 times and then break, for example.
Another solution, if you have the space, is to change it to jump somewhere unused and that won’t get written over and then put a “JP” from there into the loaded program. That works if you don’t know when a buffer is going to fill or an XOFF is going to be received etc. You don’t need a count, just the exit circumstances.
Hard Breakpoints
It occurred to me, that there is an even easier way given that the Z80 cpu running the instructions is a piece of software. What is important, is when the CPU gets to a specific address in memory; not what’s in the memory. If the CPU itself (a piece of software in the case of an emulator) could stop when it gets to a specified address, we could happily load disk information over that address or relocate programs to it. It wouldn’t matter at all. Now, a hardware CPU, probably won’t come with an “AND STOP AT” instruction nor an “AND ALSO STOP AT” instruction. But, our software one can; and it doesn’t have to be a normal CPU instruction just some extra (virtual) pins on the side of the virtual chip.
Adding Hard Breakpoints to z80sim
sim1.c contains the cpu_z80() function. This is the bit that runs Z80 programs. It looks like:
void cpu_z80(void)
{
    static int (*op_sim[256]) (void) = {
        op_nop,    /* 0x00 */
        op_ldbcnn, /* 0x01 */
        ...
        op_cpn,    /* 0xfe */
        op_rst38   /* 0xff */
    };

    ...
    do {
            ...
            states = (*op_sim[memrdr(PC++)]) (); /* execute next opcode */
            R++;    /* increment refresh register */
            ...
    } while (cpu_state == CONTIN_RUN);
    ...
}
It is possible to add a few lines before the “while” to exit the loop when a predetermined address is reached:
            if (nHardBreakpoints)
                for (i=0; i<nHardBreakpoints; i++)
                    if (PC==HardBreakpoints[i]) {
                        printf("Hardware breakpoint %d reached at %04x\n", 1+i, PC);
                        cpu_state = STOPPED;
                        break;
                    }
If there are any hard breakpoints, look through them and, if our program counter (PC) matches one, say so and stop the CPU.
You need to include some variables for information about the breakpoints:
int nHardBreakpoints=0;
int  HardBreakpoints[4];
These aren’t static to the sim1.c module because we need to set them from the z80 simulator control module, simctl.c. That contains a do_go(char *s) function.
The s parameter is the rest of the simulator command after the “g” for “go”. Normally, that would only contain the address to go from, or “\0” to go from our current (PC) address.
I’ve added a getHexArg() function as I want to check for 0, 1 or more addresses. It looks like:
static int getHexArg(char *s, int *val) {
    int i;

    for (i=0; isspace((int)s[i]); i++) ;
    if (!isxdigit((int)s[i])) return 0; // no hex digits found
    *val= exatoi(s+i);
    while (isxdigit((int)s[i])) i++;    // found. move past them
    return i;
}
The idea here is to skip past any spaces, if we don’t now have a hex digit return an error, otherwise get the value of them (using Udo’s existing exatoi()), then skip past those and return how many characters of input we processed.
We get two return values: the address in val, and how many characters as the return value of the function.
Then it becomes easy to modify the start of do_go to this:
static void do_go(char *s)
{
    int i, val, n;

    // gss: allow g [addr] [, breakpoint]...
    n= getHexArg(s,&val); s+=n;
    if (n > 0) PC= val;

    for (n=1, i=0; n>0 && i<4; i++) {
        while (isspace((int)*s)) s++;
        if (*s!=',') break;
        s++;
        n= getHexArg(s,&val); s+=n;
        if (n > 0) HardBreakpoints[i]= val;
    }
    nHardBreakpoints= i;
    ...
We attempt to get a hex arg. If there is one we set the PC to that address. We also move past that input (s+=n).
Regardless of an address or not, we then look for up to 4 sequences of (optional spaces), a comma, and another hex arg.
If we don’t see a comma we exit the loop (break). If we don’t see an address we exit the loop (for (…; n>0 …)).
If we did see a comma, and if we did get an address (n > 0), we put that address in our HardBreakpoints[] table. At the end we set the number of hard breakpoints set.
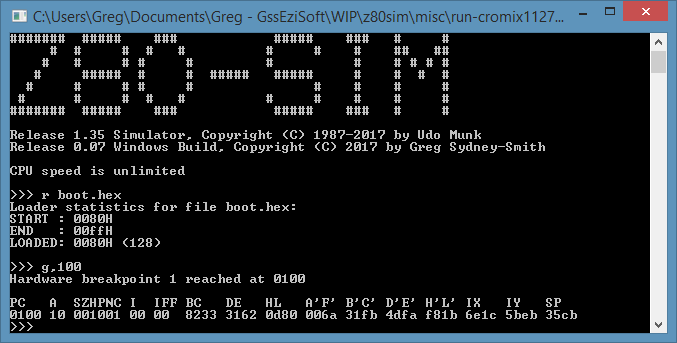
It lets me set breakpoints in places that are about to get overwritten. Examples are:
– 0080 before RDOS loads the boot sector there and jumps to it,
– 0100 before I load a CP/M or CDOS program,
– in an instruction in another bank of memory before a cromix bank switch.
It saves me from having to step through RDOS and from having to disassemble it enough to find where to set a soft breakpoint.
It saves me from having to debug / step through the CP/M loader to gain enough info to know where to set a soft breakpoint so I get control when a program loads. Of course, in that case, it is easier to use DEBUG, DDT or ZSID to load the program and let me debug it.
I hope it is of use to you. It is present in my 0.07 Windows build of z80sim. The full source code is available in cpm/z80sim/.
This is part of the CP/M topic.


The z80sim command line control is modelled after the Zilog/Mostek In Circuit Emulators we used for Z80 development in the 80th. These machines did software breakpoints the way you see it in z80sim, including the break counter.
The ICE’s of course also were able to set a hardware breakpoint, for debugging ROM code or other reasons, when software breakpoints won’t work.
When I ran z80sim the first time on the companies multi-million dollar RISC UNIX mainframe, the Z80 reached ca. 35MHz in 1987, and everyone was blown away by that 😉 Implementing a hard breakpoint needs to be done in the innermost emulator loop by an address compare, if PC has hit the break address. That would slow down the emulation significantly, so I didn’t implement it at that time, we wanted the speed for doing real work with the emulated machine and there was no urgent need for a hardware breakpoint.
On nowadays systems it can be implemented of course the way you did, the performance loss is acceptable. Will see if I can add it to a future release sometime.