An emulator is supposed to mimic the behaviour of the real thing. It should do the same things, in the same way and give the same outcomes. But sometimes they don’t quite match.
Of course, there are some cases where they can’t: a software emulation of a hardware calculator is never going to weigh the same as the real thing.
There are other cases where an emulator gets close; but is not quite there. Those are either reasonable approximations or bugs – and which of those it is can depend on your perspective. It may also depend on what you are trying to do with the emulation.
Having a HP-65 emulator that runs most of the HP-65 programs is fine for most of its users. If you are looking at a deeper level, at how the calculator does what it does, the emulation needs to be a bit closer. It needs to match the peculiarities, or "personality" of the actual device.
Why did I say, "most of the programs"?
That’s because most people don’t write programs that rely on unusual behaviour of a calculator. Programmers tend, from the outset or after some bad experiences, to write defensively. They make minimal assumptions so there is the least chance of bugs. They stay away from "edge conditions".
Given that, most HP-65 emulators should work with most HP-65 programs.
Here’s where they don’t.
The HP-65 Owners Handbook, on page 79, covers how subroutines work. The explanation is pretty straight forward and it is consistent with how they work everywhere else too. So long as you stay within the boundaries of what the calculator can do, it does what we expect.
You start a main program. It gets to a point where it goes off and calculates something. It then comes back and continues along with the main program. All is well.
The limitation is: you can only call one level of subroutine. The way the "return stack" that we are used to these days was implemented in those days, limits us to a single call / gosub. There is only one return address.
Most HP-65 programmers will have been very aware of this limitation and they will have written their programs around that. The obvious conclusion for most people is "okay – only use one level of subroutine."
However, the manual goes on to explain what happens if you don’t.
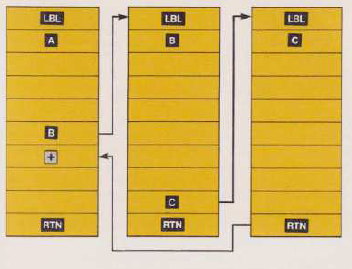
If you call another, lower level of, subroutine then the RTN at the end of that one will take you directly back to the main routine. It forgets to continue the subroutine in the middle. The diagram in the handbook shows it like this:
Now really, almost noone is going to write a HP-65 program that relies on that behaviour. The only exception I can think of is if it helps something fit in 100 steps somehow. You’d be hard pressed to find something that relies on it – but it might explain one or two programs you’ve tried that didn’t quite work and it never previously made sense.
What is interesting here is that the behaviour is documented behaviour. It is what the manual says it should do.
The emulators I’ve seen, including mine, don’t match this behaviour. They do something very different and quite strange.
Here’s a test program:
001: 23 : LBL
002: 11 : A
003: 01 : 1
004: 61 : +
005: 24 : RTN
006: 23 : LBL
007: 12 : B
008: 02 : 2
009: 61 : +
010: 11 : A
011: 03 : 3
012: 61 : +
013: 24 : RTN
014: 23 : LBL
015: 13 : C
016: 04 : 4
017: 61 : +
018: 12 : B
019: 05 : 5
020: 61 : +
021: 24 : RTN
022: 23 : LBL
023: 14 : D
024: 06 : 6
025: 61 : +
026: 13 : C
027: 07 : 7
028: 61 : +
029: 24 : RTN
You start the calculator, load the program and press D.
What you should get, per the book, is 20. X starts as 0.00 so you should see:
0, 6, +, C, 4, +, B, 2, +, A, 1, +, RTN, 7, +, RTNThat comes to 20 but the emulators currently give 18. How they get there is very strange. I saw this sequence (0.00 in X, [D] pressed):
*** step 24 key=6
*** step 25 key=+
*** step 26 key=C
*** step 14 key=LBL
*** step 15 key=C
*** step 16 key=4
*** step 17 key=+
*** step 18 key=B
*** step 27 key=7
*** step 28 key=+
*** step 29 key=RTN
*** step 1 key=LBL
*** step 2 key=A
*** step 3 key=1
*** step 4 key=+
*** step 5 key=RTN
The gosub "C" instruction is going to the start of the "LBL C" instead of to the end of it. That’s only a problem when editing an existing program (if you GTO a label, switch to W/PRGM and then start editing – you’ll be a couple of steps out when compared to the instructions in the book).
It correctly does the 6 + and then the 4 +. It should go to "B" (step 6, 7, …) but doesn’t. Instead it returns to the main program (step 27) and does the final steps: 7 +.
That is consistent with what you should get, per the book – except for the bits missing in between (2 + and 1 +).
Strangely, whilst it should finish there – if the book is to be believed – it continues past the RTN at the end of the LBL D program steps. It looks like it went to step "00 00" and then kept running, past there.
It didn’t go into any lower level subroutine at all and it got confused about where it should stop.
Keep in mind that few, if any, HP-65 programs would ever be written this way and we’re really exploring edge conditions. If the real thing does behave as the manual says it should, then the emulators aren’t emulating the real thing.
Is it a real issue?
The decider is the real world. Does running the test program on the real world HP-65 give a result of 20, like the manual suggests; or 18 like the emulators currently give?
A lot of people put a lot of work into developing the original emulators. They were all fans of the calculator and they all would have wanted to match the real thing as closely as possible. It is possible that, despite the manual, what I’m seeing is what you get on the real thing. It is probably also a pretty unused aspect, so it wouldn’t have been high on my list of test cases, and it might be that the emulators are wrong.
Does it matter?
If nothing uses these circumstances, no – not at all.
Can It Be Fixed?
If it is a real issue and you feel like fixing it, here’s what can be done.
Emulators emulate microinstructions.
The calculator’s main microinstruction for subroutines, both for calling them and returning from them, is "mark and search". When you call a subroutine, it adds a secondary pointer into user program memory and then uses that to go looking for a label (eg LBL A). Step 1 "mark" adds the new pointer and step 2 is "search".
What it doesn’t say is what happens if it doesn’t find anything. The calculator does a RTN by doing a "mark and search" for a nonexistent label. What a RTN should do is deactivate the secondary pointer so we go back to using the original (primary) one.
Most emulators are derivatives of work done previously. Most have bits in common. Here’s how the "mark and search" instruction is implemented in Version 1.01 of my emulator (using javascript):
// begin = 63 (@77), pointer = 61 (@75), marker = 57 (@71), label = 43 (@53)
function markandsearch() {

    if (prgmem.length == 103) {                     // only true if marker has been added (normally .length==102)
        var ptrpos = prgmem.indexOf(57);            // search for subpointer 57
        prgmem.splice(ptrpos, 1);                   // delete subpointer 57
    } else {
        var lblval = 0;
        var ptrpos = prgmem.indexOf(61);            // search for pointer 61
        var lblpos = ptrpos - 1;                    // start from pointer 61
        while (lblpos != -1 && lblval != buffer) {
            lblpos = prgmem.indexOf(43, lblpos+1);  // search for next label
            if (lblpos != -1) {
                lblval = prgmem[lblpos + 1];        // match label value ?
            }
        }
        if (lblval != buffer) {                     // label not found
            lblpos = 0;                             // rewind to begin
            while (lblpos != -1 && lblval != buffer) {
                lblpos = prgmem.indexOf(43, lblpos+1); // search for next label
                if (lblpos != -1) {
                    lblval = prgmem[lblpos + 1];    // match label value ?
                }
            }
        }
        if (lblval == buffer) {                     // label found    ?
            ptrpos = lblpos;                        // eureka !
        } else {
            ptrpos = 1;                             // no match then rewind
        }
        prgmem.splice(ptrpos, 0, 57);               // insert pointer 57 before lbl (43)
    }
    buffer = prgmem[ptrpos - 1];
    busy = 12;
    fs[5] = 0;                                      // for circular memory waiting
}
A C, Java or even VB language implementation is likely to look pretty similar. In essence:
- It checks if the secondary pointer (called "marker" in the code above) is already present.
- If so, it removes the secondary pointer and finishes.
- Otherwise, it looks for a LBL (internal code 43).
- If it finds the right one, it adds a secondary pointer there.
- If not, it puts the pointer at step "00 00" in program memory.
The process works for normal programs, mostly. It will successfully do a call. It will successfully return from one. It will even go to step "00 00" if the RTN key is pressed from the keyboard. It is a pretty good implementation.
Where it doesn’t do so well is at a RTN in a main program. If there isn’t a secondary pointer and RTN is executed, the SECONDARY pointer is moved to step "00 00". In the traces I did with the above HP-65 test program, the emulators then moved the secondary pointer to the next step, step 001, and ran the "LBL A" subroutine – which is just whatever happened to be at step 001.
It also doesn’t do very well with subroutines from subroutines. The current implementation just quits if there is already a secondary marker present. You’re in main routine D, you go into subroutine C, you see a command to go into subroutine B but we’re already in a subroutine so you ignore it. You finish up subroutine C and then go back to main routine D.
Here’s what I changed the implementation to:
// 20170328: note - if marker already present should leave it alone and goto lbl instead
// begin = 63 (@77), pointer = 61 (@75), marker = 57 (@71), label = 43 (@53)
function markandsearch() {
    var pos;

    if (prgmem.indexOf(57) < 0) { // if no sec ptr yet
        pos= prgmem.indexOf(61);
        prgmem.splice(pos,0,57);  // add sec ptr
    }
    searchforlabel();
}
It’s a lot shorter. It better matches the instruction name – it just marks the current position (with a secondary pointer) and then searches. The behaviour also matches that in the book.
You rarely get off quite so easilly though and I did need to adjust the implementation of the "searchforlabel" microinstruction slightly too.
That went from:
// begin = 63 (@77), pointer = 61 (@75), marker = 57 (@71), label = 43 (@53)
function searchforlabel() {
    if (prgmem.length == 103) { var ptrval = 57; } else { var ptrval = 61; }
    var ptrpos = prgmem.indexOf(ptrval);               // remove pointer 57 or 61
    prgmem.splice(ptrpos, 1);
    var lblval = 0;
    var lblpos = ptrpos - 1;                           // start from pointer - 1
    while (lblpos != -1 && lblval != buffer) {
        lblpos = prgmem.indexOf(43, lblpos+1);         // search for next label
        if (lblpos != -1) {
            lblval = prgmem[lblpos + 1];               // match label value ?
        }
    }
    if (lblval != buffer) {                            // label not found
        lblpos = 0;                                    // rewind to begin
        while (lblpos != -1 && lblval != buffer) {
            lblpos = prgmem.indexOf(43, lblpos+1);     // search for next label
            if (lblpos != -1) {
                lblval = prgmem[lblpos + 1];           // match label value ?
            }
        }
    }
    if (lblval == buffer) {                            // label found ?
        ptrpos = lblpos;                               // eureka !
    } else {
        ptrpos = 1;                                    // no match then rewind
    }
    prgmem.splice(ptrpos, 0, ptrval);                  // insert pointer 57 or 61 before lbl (43)
    buffer = prgmem[ptrpos - 1];
    busy = 12;
    fs[5] = 0;                                         // for circular memory waiting
}
to:
// begin = 63, pri pointer = 61, sec ptr "marker" = 57 (071), label = 43 (053)
function searchforlabel() {
    var ptr, pos, nxt;

    // if we are in a subroutine, we need to look for the sec pointer not pri pointer
    // we are in a subroutine if the sec ptr exists
    ptr= (prgmem.indexOf(57) >= 0) ? 57 : 61;

    // find the pointer NOTE: assumes found; never = -1
    pos = prgmem.indexOf(ptr);

    // remove the pointer
    prgmem.splice(pos, 1);

    // search for LBL buffer from here to end of prgmem
    if ((nxt=aarFindLbl(pos,prgmem.length-1,buffer)) < 0)
        // and if not found, from start to here
        nxt= aarFindLbl(0,pos-1,buffer);

    if (nxt>0           ) { prgmem.splice(nxt+2,0,ptr); buffer= prgmem[nxt+1]; }
    if (nxt<0 && ptr==61) { prgmem.splice(1    ,0,ptr); buffer= prgmem[0]; }

    busy = 12;
    aarSetHwFlags();
}
I don’t like repeated blocks of code so I added the "aarFindLbl(start,end,target)" bit, but the main changes are:
- Position the pointer after "LBL x" when found ("nxt>0"); instead of before it.
- Only goto step "00 00" if not found and you’re in a main routine.
- Otherwise (not found but in subroutine) the secondary pointer has been removed so you’ll resume with the primary pointer ie RTN to the main routine.
It does leave one wondering if GTO a missing label in a subroutine results in a RTN with a real HP-65.


The real thing does produce 20 with the test program. Thank you to Brad Barton for checking this for me.
Tony’s emulator (at http://www.teenix.org/) has already been updated.
Mine (http://www.sydneysmith.com/products/gss-hp65/run/) has been updated too now. You may need to refresh your browser to pick up the updated pages.
You can still access the older version, if you want to see the bug in action, via http://www.sydneysmith.com/products/gss-hp65/1.01/