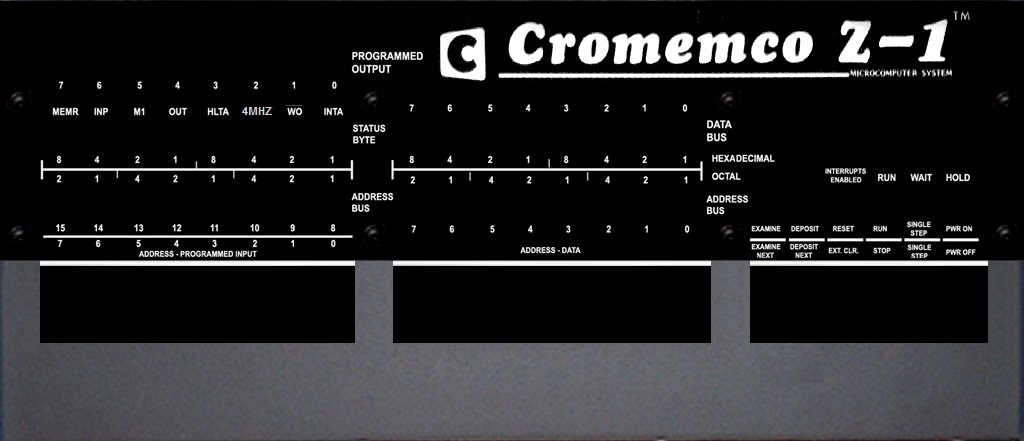
The z80sim program had a Front Panel before I got to it and cut things out to get it running on basic Windows. The picture above is what the front of a Cromemco Z1 computer looks like. I think it was taken by Udo. It is included in the files distributed as part of his z80pack and it is believed to be covered by the pack’s open source license. There is a story that one of his images ended up, uncredited, on a commercial poster site; so I’m specifically mentioning credit here.
Anyway, the picture is missing some bits. There are a whole set of red and blue switches that fit into the rectangular holes towards the bottom. (I suspect the copied artwork included the switches as it would definitely look better with them.) Pictures of those are also present in z80pack and the Front Panel system combines them and presents a lifelike and clickable window that lets you flick switches and enter programs by hand.
It is a really good idea and it did appeal to me (especially given I did the same thing for my calculator emulators years ago). There’s something nice about seeing it there in front of you.
However, to get z80sim running on basic Windows, it got cut. The Front Panel code is “compiled in” and without the necessary libraries it wasn’t compiling anything. It was one of the first casualties of the port. I’m sure it all runs nicely on unix and MacOS. It looks like it used to run nicely under cygwin, and it may still do so. My goal was: “download, unZIP and run” on out-of-the-box Windows and it wouldn’t run without a lot of stuff getting installed with it. The latest of my builds of z80sim is 205K; and that includes a 1.2 MB disk. The smaller of the two setup programs (the 32bit version) for cygwin is 881K; and that is just a downloader that proceeds to download lots of packages beyond that.
I do believe the people telling me that cygwin is good, and worth having, but there will be lots of people that don’t already have it. So the Front Panel went.
Check_Gui_Break
Udo had a line “check_gui_break()” commented out in the code (using #ifdef / #endif). This was placed in the emulated CPU’s instruction loop so that if all else fails, you could always stop the CPU and return to the monitor program. Infinite loops needn’t be infinite any more. It was a really good idea and, whilst there wasn’t any code to go with it, it was clearly a placemarker for something with enormous benefit.
In version 0.10 of my build of Udo’s z80sim, I’ve removed the #ifdef / #endif pair and added some code to use it.
The only problem was: I didn’t have a GUI to check to see if “break” had been pressed. No GUI equals no “GUI break”.
A GUI for a Break Button
After a bit of time looking through what I’d removed, I realized that the included Front Panel system is quite sophisticated. I can see why he likes it and used it. It still has a lot of dependencies though, that I still cringed at. It shouldn’t be that complex on an operating system such as Windows that does things like, er, windows. Of course, Windows programming has always seemed to take the hardest possible route to the destination – so adding several languages, tool chains and libraries MIGHT actually be simpler than asking Windows to create a window.
To cut a long story short, after many of the usual Windows frustrations, I ended up with a custom built Windows Front Panel library.
It is pretty simple. It displays an image and lets you click parts of it. It’s not that different to how my HTML5 calculator emulators work. In those cases the Front Panel window is any browser on any device (with HTML5 support). In our case with z80sim running on Windows, it is a Windows OS window from a Windows program. The Front Panel Library is compiled as a library (DLL) so I don’t have to “dirty up” z80sim with lots of Windows OS specific code – we just call a few primitive functions in the library and build up from there.
The library concept is: initialize (with defaults), change defaults (if required), show the GUI, read switch settings (or send them so the switch moves), and shutdown. As a concept, that could apply to any implementation of a Front Panel so I think it will port to any later solution.
Size? The DLL is 80K. That’s huge if you’ve been doing CP/M stuff recently; but it is very small in the Windows world.
Dependencies? None. I had to add some stuff specifically to ensure that all you need is a vanilla Windows installation.
The Result
If you download, unZIP and run Windows build 0.10 of z80sim Version 1.35; you’ll see two windows:
– the usual console one, and
– a GUI one with buttons.
The new one looks like this:
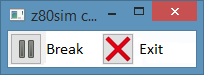
It’s pretty boring really; but it does work.
You can press/click the Break button or Exit button anytime the CPU is running and it will break to the monitor or exit to the host operating system. It doesn’t do anything if the CPU isn’t running and calling check_gui_break().
Making Changes
There are three additional files with build 0.10. These are:
– the DLL (devWin.dll),
– a screen format file saying what is where (z80sim.sfmt), and
– a picture of the front panel (sim-pnl.bmp).
If you don’t like the boring-ness of the GUI, you can change how it looks without recompiling anything. Just change the z80sim.sfmt text file and give it a new picture.
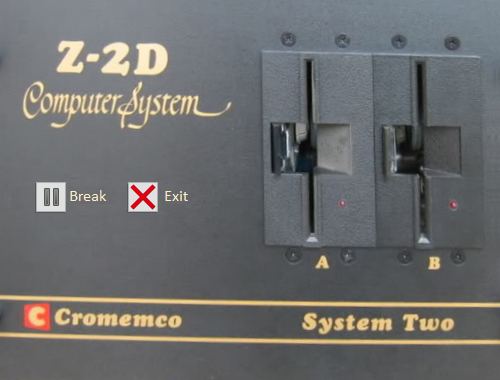
Here’s an example I did earlier:
The z80sim.sfmt file for it looks like this:
# Z2D Front Panel

scale 250 190
size  250 190 0

page 1
background "z2btns-sm"
button  11  16  90 44 16 1
button  11  62  90 44 16 2
The “z2btns-sm” line refers to a bitmap file. You can get a copy of the one I made from z2btns-sm.bmp. It is free for any use anywhere; even by commercial poster shops.
The “scale …” line refers to the scale used for the picture and the “button id x y w h value” lines.
The “size w h mode” line is how big the GUI should be. This can be more or less (or as shown, the same) as the scale. Mode 0 is resizable so you can drag the Front Panel to be bigger or smaller if you wish. The aspect ratio stays the same so you could end up with white space if don’t drag it proportionally. (If you get it wrong, it’s easily fixed by dragging one edge in or out.)
Button/switch id 11 is what check_gui_break() looks for. A value of 0 is returned if neither button was pressed. A value of 1 causes BREAK. A value of 2 causes EXIT. You can put the buttons any where you like and have them look any way you like.
There’s nothing hooking up the 16/64FDC card to the disk drive lights in the picture above; but the library is capable of turning on either of the lights when the head is loaded or a read/write is occurring. That’s a later update. A power light which is on when the CPU is running might be a good idea too. The real thing had a power switch and a reset switch but these were at the back of the chassis; not the front. A Cromemco System Three with its front-mounted key switch might be a better choice for a Front Panel….
More Changes
Here’s one where I’ve tidied it up a bit and moved the power and reset switch from the back of the chassis to the front:
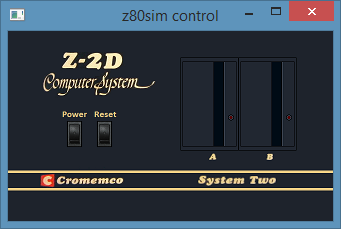
If the system is running, pressing the power switch turns everything off (exits z80sim).
If the system is running, pressing reset takes you back/into the z80sim monitor (does a break). From there you can reboot (r boot.hex, g), resume (g), examine or change registers, and so on.
It still doesn’t have a power light – I’d need to change the program to turn it on and off as it exits/returns to the monitor.
You can download a ZIP with the updated image and all necessary files from cpm/z80sim/z80sim-0.10-run2.zip. As usual, it’s just: download, unZIP, and double-click run.bat.
Opting Out
If you don’t like having a GUI, just delete or rename the DLL.
The code is dynamically loaded and everything will run normally if it isn’t present. Calls aren’t made to missing functions. “check_gui_break()” will return 0, meaning nothing was pressed.
This is part of the CP/M Topic.


The front panel library can be build as a native Windows dll, the port was done by Stefano Bodrato. You as a developer need Cygwin and MinGW for building it, the end user needs
the emulation.exe and libfrontpanel.dll. There is a test release at the z80pack repository, that shows, that a native Windows dll is doable. However, this is difficult to build, you might want to talk to Stefano about this, my knowledge about native Windows programming is limited.
There was a third party GTK GUI for z80sim, with register pane, disassembler pane, memory dump pane and single step/run buttons, so that one could run the machine from a GUI instead of the command line. That is why there it the check_gui_break() hook. Also the disassembler has a hook for a GUI, where it provides a string with the source line.
However, nice to see that someone makes use of it again.