SYSGEN is used in CP/M to copy an operating system onto a new disk.
In many cases, it is safe; but sometimes it’s not. Here’s why, and when it is and isn’t safe.
SYSGEN was written by Digital Research and is supplied as part of CP/M. You can download a copy from anywhere that has CP/M or from cpm/programs/SYSGEN.COM.
If you disassemble it to see what’s “under the hood”, you’ll get something like cpm/programs/SYSGEN.Z80. That’s my disassembly and my interpretation. Plenty of people have wondered and looked before me.
Here’s what is probably the actual Digital Research source code cpm/programs/SYSGEN.ASM. Much of the CP/M software was made open source a number of years ago and this listing came from DRIPACK/CPM_2-2/UTILSRC.
One of the first things you’ll notice when looking through the disassembly or source code, is the disk parameters towards the start of the program. There is:
– the number of reserved tracks in 0128H,
– the number of sectors per track in 0129H, and
– a “skew” table for that many sectors at 012AH.
This means the disk geometry is built into the program rather than coming from the BIOS.
Standard CP/M
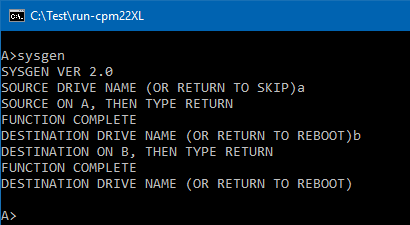
Given how SYSGEN works, you should be fine if you’re using four identical 8 inch, single-sided, single-density disk drives. It will read an operating system from one of the drives, and write it to exactly the same tracks and sectors of that drive, or one of the other drives.
5″ Systems
SYSGEN is built for patching. The way it is arranged makes it easy to change. If you patch the values in 0128H, 0129H and from 012AH; you can update SYSGEN to work with 5 inch drives instead.
If you have patched SYSGEN, and if you only use it on a system with four identical drives of that type; you’ll be fine.
However, don’t get the original and the patched versions of SYSGEN.COM mixed up. Using either on the other’s disks will mess up the SYSGEN. I’d suggest renaming the patched one SYSGEN5.COM.
Single and Double Sided Drives
Many BIOSes implement double-sided drives as “twice as many tracks”. Traditionally, Track 0 is on the first side (eg Head 0) and track 1 is on the other side (Head 1). This miminizes movement of the head as two tracks are read for each stepping of the head in or out. It would also be possible to do double-sided, within the BIOS, as twice as many sectors.
SYSGEN calls the BIOS to read or write the system tracks so, IF (as most do) the BIOS doubles the apparent tracks; you should have no trouble SYSGENning to or from a double-sided disk. In the 8″ situation, you can SYSGEN two sequential reserved tracks from a single-sided disk to two colocated surfaces (top and bottom) of the same physical track on a double-sided disk.
It also works the other way around (double-sided to single sided) and it also works even with the other track/side order (all tracks on surface 0 then all tracks on surface 1).
It doesn’t work if you are SYSGENning on one double-sided system to use the disk in another double-sided system that picked a different track order (0-76 on Head 0 then 77-153 on Head 1, vs 0-76 on Head 1 then 77-153 on Head 0, vs 0,1,2,… on Head 0,1,0,…; vs 0,1,2,… on Head 1,0,1,…).
If the BIOS chose to double the number of sectors instead, then SYSGEN will have trouble. We’re looking at SYSGENs between double and single sided drives and, if the number of sectors is different, SYSGEN will have the wrong figure for SOURCE or for DESTINATION.
You can still use SYSGEN; but you have to be careful. If it has the doubled number of sectors patched into it, only SYSGEN TO a double-sided disk. You’d need to use MOVCPM beforehand to have the source OS in memory. You can also SAVE the image and then use “SYSGEN filename” to get the source OS back into memory.
You can also SYSGEN FROM a double-sided disk; but you have no way of transferring the OS image with the modified SYSGEN to a normal disk. Again, you could have a SYSGEN.COM and a SYSGEND.COM or a SYSGEN5D.COM; but it’s now getting complicated.
Boot Sectors
Whilst we’re discussing transferring an OS between single and double sided disks, I should mention the boot sector. This is the very first sector in the system area of a CP/M disk. It contains just enough software to load the rest of the system area into memory and run it.
If a disk is double-sided, there will be a command to select the side. This is often a single bit that gets sent to an IO port (OUT (nn),A). In most disk formats, the system area consists of 2 (or more) tracks. This means that the boot sector for a double-sided disk is likely to contain OUT instructions to switch between sides. The same instructions are unlikely to be relevant / workable / present in a single-sided boot sector. That is going to need commands to step the drive to the next physical track instead.
A SYSGEN from one disk type to a different type, is going to copy the SOURCE boot sector to the destination disk. In most cases, it will not work with the destination disk. In some cases, the boot sector contains enough software to work out the disk format and change its behaviour accordingly. However:
- this is hard to fit within only 128 bytes (boot sector size), and
- many rely on “disk type” bytes embedded in the sector.
SYSGEN blindly copies the SOURCE disk type bytes in the original boot sector, to the DESTINATION disk. This means, for example, copying an 8″ SSSD OS to an 8″ DSSD disk results in a boot sector that thinks it is still on a SSSD disk.
Patching the disktype on the DESTINATION disk to the correct value would allow a smart boot sector to then work. Without patching, the DESTINATION disk will probably be unbootable.
In most cases however, the boot sector isn’t that smart and you’ll need to completely replace the entire boot sector with one that matches the disk type.
You can use cpm/programs/DU.COM (Disk Utility) to copy a boot sector from one disk to another. Just make sure the copy is between disks of the same format (type).
Between 5 and 8 inch drives
This should be fraught with difficulty; but it is possible. It is easier if you patched a copy of SYSGEN for 5″ SSSD disks and called it SYSGEN5.COM as mentioned above.
Use SYSGEN5 to copy an image from a 5″ disk into memory. Then use the unpatched SYSGEN.COM to write from memory to an 8″ disk. Or vice versa.
Again, the boot sector will almost certainly be wrong and the newly SYSGENned disk probably won’t boot as is. 5″ and 8″ disks have a completely different number of sectors per track. An 8″ boot sector will probably try to read sectors that aren’t present on a 5″ disk. A 5″ boot sector will skip loading parts of the OS when used on an 8″ disk. It will also loads bits that aren’t part of the OS, as a 5″ boot sector loads an extra track when compared to an 8″ one.
Double Density
Double-density adds even more chaos.
In theory, it shouldn’t even be possible to use a double-density disk with SYSGEN as the sector size is wrong. However, under CP/M 2, the BIOS is required to translate the physical sectors into neat 128-byte CP/M records; and SYSGEN uses the BIOS, so it can be made to work.
You’d need to patch SYSGEN to match the apparent number of sysarea tracks and sectors. A double-density 8″ disk has 16 sectors per track and each is 200H bytes long. This means CP/M sees 64 records per track.
There’s only 52 records in a standard CP/M sysarea. That’s why there are normally 2 reserved tracks on a normal 8″ disk (SSSD, 26 sectors per track). With a double-density 8″ disk, you should drop the number of reserved tracks to 1. You can use 64 or 52 as the sectors-per-track value in SYSGEN. It just reads and writes to low memory (0900H-…) so there is plenty of room for sectors. Don’t forget to extend the “skew” table at 012A to match. It looks like 64 sectors will just fit with the available space.
With CP/M 3, they moved to the BIOS using physical sector sizes instead of CP/M 128-byte records, so this approach won’t work with CP/M 3. However, that seems to have a very different set of tools.
Cromemco Disks
Cromemco is one of the organisations that embeds the disktype in the boot sector so correcting the boot sector for these can be as simple as changing 6 bytes. However, earlier boot sectors didn’t use the embedded disktype so if you have an early boot sector you may need to find a later version, or an early one that matches the DESTINATION disktype.
DON’T try to use SYSGEN with a Cromemco double-density disk. Those disks are actually mixed formatting and SYSGEN does not have any hope of working with that combination without a complete rewrite.
DON’T try to use SYSGEN under CDOS, the Cromemco Disk Operating System (CP/M look alike). I have heard reports that the BIOS jump table (present in CDOS) doesn’t work as expected. SYSGEN uses the BIOS jump table.
Cromemco have WRTSYS.COM as their equivalent of SYSGEN. I have not yet disassembled that so I don’t know if it copes better with transfers between disk types or whether it will run under “vanilla” CP/M.
Data Disks
I recently came across an old post somewhere that mentioned “data disks”. These had been configured in the BIOS with reserved tracks = 0.
The idea would have made sense in the CP/M era. A normal 8″ disk stored 241 KB of data and setting reserved=0 would boost that to 248 KB. With 5″ disks you’d go from 81 KB to (40x18x128 – 2K directory =) 88 KB.
With the introduction of double-sided and double-density disks, the increase in storage gained by setting reserved=0 becomes a much smaller percentage. However, if you are never going to put a disk in drive A and boot from it; having space on it for an operating system is indeed a waste.
Using SYSGEN on a data disk will destroy the directory and you’ll effectively lose all of the information on the disk.
Having SYSGEN read from the sysarea of a data disk will not give you an operating system and any subsequent write will give you an unbootable disk.
A Better SYSGEN
For CP/M 2, the BIOS returns information about what it thinks the format of the disk is. This means SYSGEN could have adapted to work across disk formats. You could actually SYSGEN from a 5″ disk to an 8″ disk or between single and double sided and single and double density disks.
To be fair to Digital Research, these sorts of issues only arose after we’d all been using CP/M for long enough to want to introduce different (larger) disk formats. What they did was right at the time.
Please note that, whilst using “what the BIOS thinks is the disk format” is better than using one set of hard coded values; it doesn’t guarantee you have the right disk in the drive. Some BIOSes auto-sense the disk type. Others are configurable. Many others just use what they were told. In the real world, you’re unlikely to get an 8″ disk in a 5″ drive; but it isn’t that black and white with emulators.
The changes to SYSGEN to have it use the CP/M BIOS Disk Parameter Block (DPB) are, basically:
     ;on disk select: update rsvd, spt, "skew"
     CALL new1
     ...
new1 LD ...
     ;
     ; 1. Checks
     ; if no DPH or DPB then no drive, print error
     ; if no reserved tracks, print error
     ; if spt>64 print error
     ; print "Transferring %d tracks of %d sectors"
     ;
     ; 2. Update Rsvd and SPT
     LD (0128H),A
     LD A,...
     LD (0129H),A
     ;
     ; 3. Update "skew" table
     ; for (i=1 to spt)
     LD HL,012AH
     LD B,spt
     SUB A
n061 INC A
     LD (HL),A
     INC HL
     CP A,B
     JP NZ,n061
     RET
I have made the above changes and you can download the source and binary from cpm/programs/SYSGEN2.Z80 and cpm/programs/SYSGEN2.COM.
Here’s an example of SYSGEN2 running:
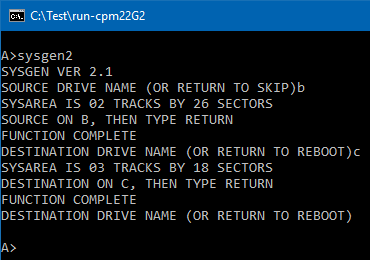
You can see it copy from an 8″ SSSD disk to a 5″ SSSD one.
Here’s another example where the C drive was modified for data disks
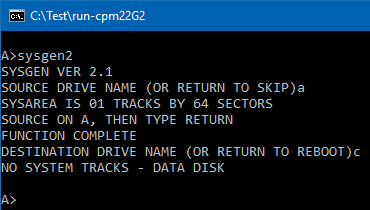
In this case we tried to copy from an 8″ DSDD disk to a 5″ SSSD with no tracks reserved for an operating system. It saved us from destroying the disk.
Boot Sectors
Whilst SYSGEN2 will work with any disk type that the BIOS can use, it doesn’t automatically replace the boot sector with one that will work for the DESTINATION disk type.
My solution for my Gen2 hardware (see CP/M 2.2 GEN2) was to reduce the boot sector to little more than an LDIR and JP instruction. The same boot sector works, on my new virtual hardware, for any disk type.
However, for my older hardware, or if you’ve got a real-world system or a different emulator, you’re likely to need to replace the boot sector when copying between disk types. Some options are:
- Use DU.COM to transfer a boot sector from the same disk type.
- Only ever SYSGEN from and to the same disk types.
- Use ZSID or DDT to replace the boot sector. You SYSGEN an image into memory, save it, use ZSID or DDT to reload it, load a boot file over 900H-97FH (ibootXYZ.sys r800), exit, and then reuse SYSGEN to write the corrected system tracks.
- Use “cpmfs disk.dsk wr 0 1 bootXYZ.sys” from outside the simulation (ie from Windows, see cpmfs-version-0-03-released)
My preferred approach is to update my earlier systems so the boot sectors for those are also just LDIR and JP. Then I can SYSGEN2 the same boot sector and OS from any disk type to the same or any other disk type, and have it boot.
The SYSGEN Bug
Section 6.6, “BIOS Entry Points”, from the “CP/M Operating System Manual” for CP/M version 2.2 says for SETTRK, “Register BC contains the track number for subsequent disk accesses on the currently selected drive” and “Register BC can take on values in the range 0-76 corresponding to valid track numbers for standard floppy disk drives and 0-65535 for nonstandard disk subsystems.”
Despite this, SYSGEN assumes the the track number is passed only in the C register and that the BIOS ignores what is in B.
If your BIOS supports hard disks with multiple heads and/or more than 77 tracks, it is likely that CP/M will ask your BIOS for tracks beyond 0-255. This means your BIOS will have to consider what is in the B register.
In the DRIPACK listing, under RWTRK, you’ll see a “MOV C,M” instruction to set the track number via your BIOS. There isn’t anything setting B to 0 near it. If you look further down, in RWSEC, you’ll see that BC is set just prior to “CALL DMA”. There are some “PUSH” and “POP”s that affect BC; but none that undo the DMA address being in BC.
By the time SYSGEN gets to ENDTRK and goes back to RWTRK to read the next track, B contains some value above 09H. (The DMA buffer starts at 0900H).
If your BIOS accepts track numbers in BC, as per the manual, SYSGEN will ask it to go to some track after 0901H (2305) instead of to track 1.
I’ve included a fix for that in SYSGEN2.Z80 (and .COM). It is really simple: you’ll see IOTRK at 500H do “LD B,0” then “JP” into the original IOTRK1.
With a high-end BIOS and without the fix, you’ll see something like:
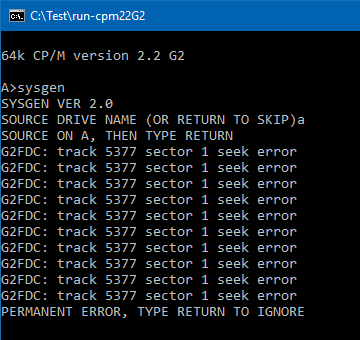
That’s with an “out-of-the-box” SYSGEN so 8″ SSSD, 26 sectors per track. After 26 sectors, the DMA value will be 0900H+13*100H = 0900H+0D00H = 1600H. The last DMA value was 1580H so B contains 15H. SYSGEN is asking for track B=15H C=01 (=5377).
It is possible that I’m looking at a CP/M 2.0 SYSGEN and that the move to two byte track numbers happened sometime between CP/M 2.0 and CP/M 2.2. It’s just something to be aware of.
Addendum:
A CP/M 2.0 manual also says “BC” for track; but the CP/M 1.0 version just says C”. It looks like a real bug that crept in (got missed) during the update from Ver 1 to Ver 2.


Greg, thank you ever so for you post.Much thanks again.